
The addition of Coruscant to the listing of explorable planets in Star Wars Jedi: Survivor was a shock to make certain, however a welcome one. It’s the longtime capital of the galactic institution and a dystopian ecumenopolis with aliens of every type unfold throughout a number of metropolis ranges. Cal’s adventure in Jedi: Survivor takes place just under the floor within the Undercity of Coruscant, and we’ve discovered all the collectible places and created maps for the place to seek out every thing.
All Coruscant collectible places in Jedi: Survivor
The maps present the place to seek out all the Coruscant collectibles places in every district. You’ll discover all the Priorite Shards, Databank Entries, chests, Pressure Essence Factors, and Pressure Tears with this information. Written descriptions add extra context in learn how to attain the completely different collectibles, in addition to what’s contained in the chests.
Notice that Priorite Shards, Databank Entries, and Chests are marked on the maps with in-game icons. Pressure Essence Factors and Pressure Tears are circled.
Picture by PC Invasion
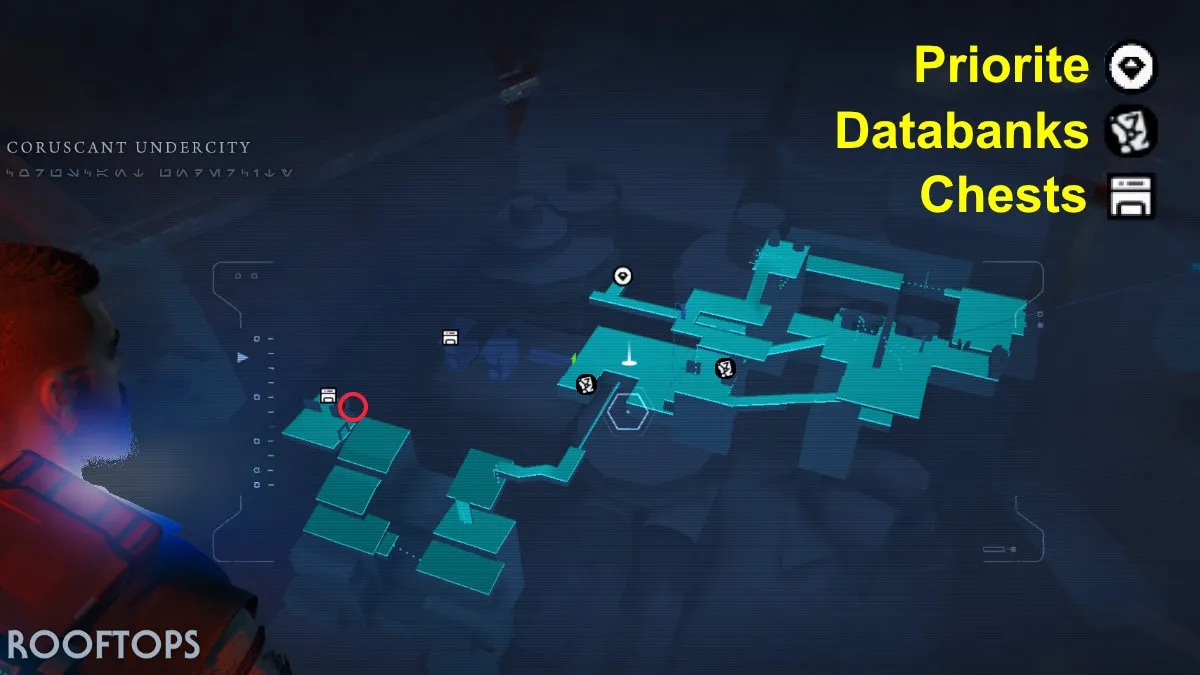
All Rooftops collectibles
It doesn’t take lengthy to understand you possibly can’t unlock all the collectibles across the completely different Coruscant places in Jedi: Survivor. The primary room you drop into includes a locked door and requires the Slicing talent to open. As such, it’s essential to return to Coruscant to finish every thing after you’ve progressed via a big chunk of the principle story in Jedi: Survivor.
All Databanks Entries
The Databank Entries are each close to the Meditation Level. The primary is only a few ft away within the nook of the plaza close to the safety door. The second is up one degree on a small touchdown. It’s the identical path that follows the principle story, making it tough to overlook.
All Priorite Shards
There’s solely a single Priorite Shard within the Rooftops space and it’s close to the Meditation Level. There’s a bridge one ground above the north finish of the plaza. The Priorite Shard is on the finish of that bridge within the nook on a container.
All chests
Two chests fill out the Rooftops space. The primary chest is within the first room you drop into throughout the principle story. It’s tough to overlook. It incorporates the Persistence lightsaber Emitter.
The second chest is on the finish of a upkeep space which branches off from the plaza with the Meditation Level. You’ll must Slice the door to open the part after which Pressure Push a hatch shut to dam a circulate of water. Soar throughout the sections to succeed in the chest. It incorporates the Persistence lightsaber Change.
All Pressure Tears
The primary room you drop into throughout the principle story additionally incorporates the Pressure Tear behind a safety locked door. You’ll want the Pressure Raise capacity to entry it. It’s the Fractured Malice problem.
Picture by PC Invasion
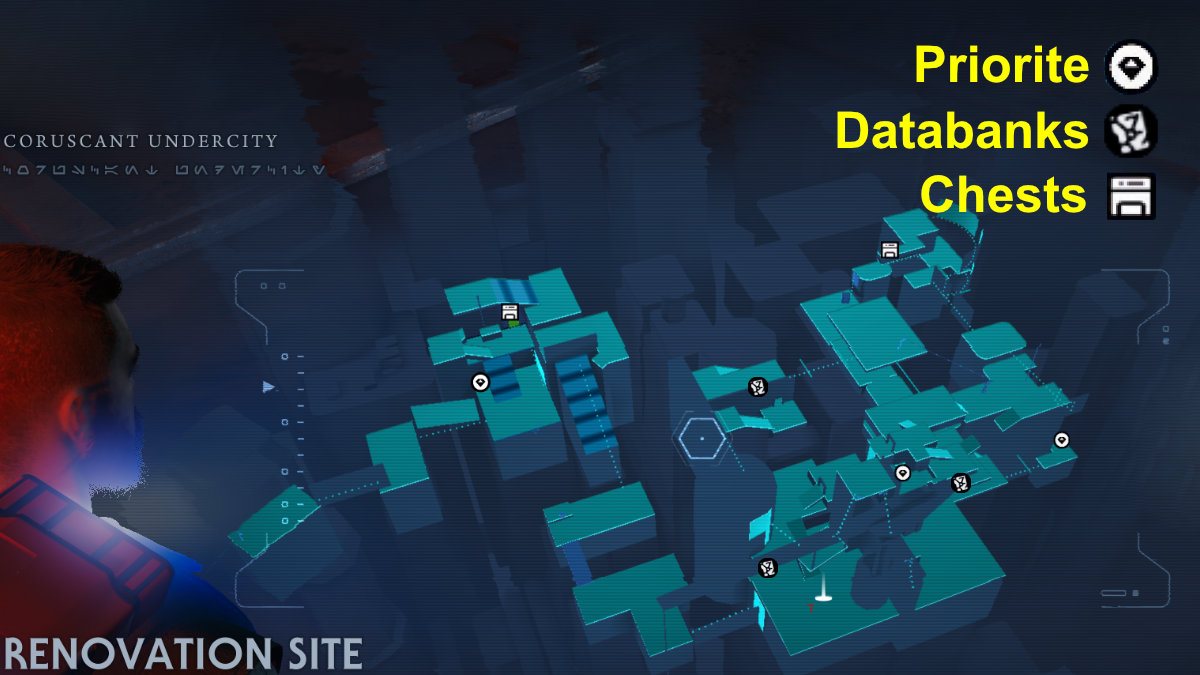
All Renovation Website collectibles
All Databank Entries
The primary Databank Entry is originally space of the Renovation Website close to the Meditation Level. Look to the left instantly upon getting into the Renovation Website to identify a scannable terminal.
The subsequent Databank Entry is within the subsequent space inside the constructing with the bar/kitchen. Go up the ramp and run alongside the lit billboard signal then enter via the doorway. Scan it on the space to the left.
Observe the route for the principle quest up till the purpose the place you swing on the rope and climb as much as the higher degree of the Renovation Website. Take an instantaneous left after climbing up and go down one degree throughout the gapped staircase. There’s a terminal within the room under which holds the Databank Entry.
All Priorite Shards
The primary Priorite Shard is again on the northwest nook of the Renovation Website, tucked away in a small alley by a big ramp. It’s to the left instantly after the final wall-run impediment.
There’s a Priorite Shard tucked away on a decrease degree within the Southeast nook of the Renovation Website. Go right down to the big plaza space the place all of the Stormtroopers patrol after which up the close by stairs. Take a left and cross the expanse through the poles. The Priorite Shard is on a crate there.
The final Priorite Shard is beneath the staircase simply earlier than you squeeze via the upkeep hall on the endpoint of the Renovation Website throughout the principle story.
All chests
There’s a chest hidden close to the again of the Renovation on an higher degree on the northeast finish of the placement. Go to the part the place there are a number of traversable billboards and run throughout the primary to climb as much as the subsequent degree. Flip round after which wall-run throughout the 2 higher-up billboards to succeed in a touchdown. The chest is down a brief hallway and incorporates the Persistence lightsaber grip.
The second chest requires the BD-1 Slicing capacity open a locked door on the northwest finish of the Renovation Website. It incorporates the Coruscant Paint BD-1 coating.
Picture by PC Invasion
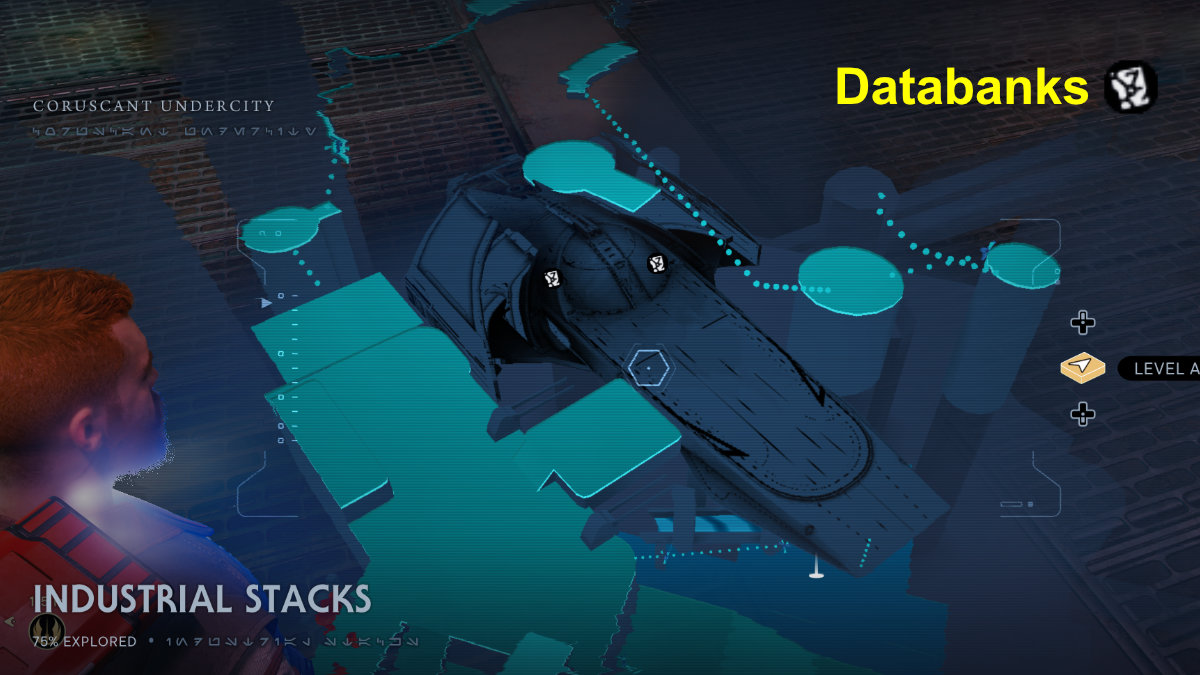
All Industrial Stacks collectibles
That is the place the Imperial Senator’s ship crashes and Cal’s workforce boards it. This can be a fast part to finish.
All Databank Entries
There are two Databank Entries inside the ship down within the Senator’s workplace. One of many entries is on the wall behind his desk. The opposite is on the far aspect of the room.

Picture by PC Invasion
All Undercity Meats collectibles
Undercity Meats is comparatively sparse, however you’ll should return to this space on Coruscant to get all of the collectibles after you’ve unlocked extra skills throughout the principle story in Jedi: Survivor. You’ll want Merrin’s Appeal to Air Sprint via a ray defend in addition to BD-1’s Electro Dart to cost an influence conduit and open a door.
All Priorite Shards
There’s a raise behind a ray defend in the back of the Undercity Meats, simply earlier than the encounter with the Purge Trooper. The Priorite Shard is definitely beneath the raise, so that you’ll must set off it to go up, then instantly get off of it to disclose and entry the Priorite Shard.
All chests
There’s just one chest in Undercity Meats and it’s simple to get the primary time you cross via the placement through the marketing campaign. This is likely one of the Stim improve chests, which makes it worthwhile.
Discover the chest in the principle open room of Undercity Meats. That is after you escape the conveyor belt part and climb up a vertical part. You’ll know you’re in the proper place from all of the pink lighting and the open house. Method the scalable wall and double bounce up the wall to climb as much as the touchdown with the chest on the finish of the corridor.
The one catch to accessing this chest is the Imperial Safety Droid boss guarding it. These enemies are powerful to beat earlier on within the sport, however once more, the improve is well worth the hassle.
All Pressure Essence Factors
There are additionally two Pressure Essence Factors. The primary is straightforward to get through the first playthrough. Take a left right into a aspect corridor within the chilly meat storage room and also you’ll instantly discover it.
The second Pressure Essence Level is behind the locked door within the room the place the Purge Trooper spawns. Use BD-1’s Electro Dart capacity to activate the facility conduit and open the door. This unlocks an Easter egg of types, as a result of a Jotaz creature from Jedi: Fallen Order emerges to struggle. Defeat the Jotaz and declare the Pressure Essence Level.
Picture by PC Invasion
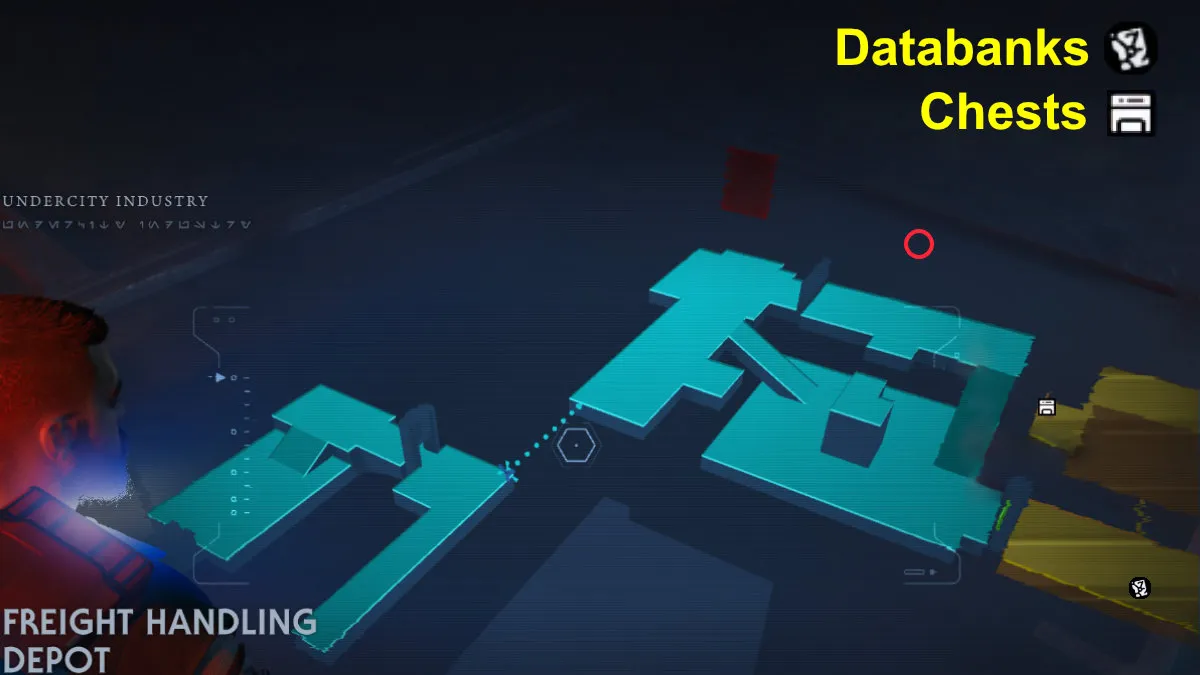
All Freight Dealing with Depot collectibles
There are three collectibles within the Freight Dealing with Depot. You may get the chest and the Databank Entry on the primary playthrough, however the Pressure Essence Level requires Air Sprint and Merrin’s Appeal to entry behind the ray defend.
All Databanks Entries
You’ll simply spot the Databank Entry within the hallway on the way in which out of this space should you don’t already odor the irresistible aroma of the Turbo Canines.
All chests
There’s solely a single chest on the Freight Dealing with Depot. Take the zipline up as if continuing to the subsequent space, out of the Freight Dealing with Depot. Flip round instantly upon ziplining up after which wall-run down the hall to the ledge the place the chest is. It incorporates the Coruscant Paint weapons coatings.
All Pressure Essence Factors
A single Pressure Essence Level is at this location. Grapple onto one of many cargo containers passing via the placement and use it to Air Sprint via the inexperienced ray defend the place the conveyor belt passes. Journey down the hallway as soon as via it and also you’ll discover the Pressure Level by a window on the proper.

All Hanger 2046-C collectibles
We mixed the Skylane Regulation Station and Hanger 2046-C into one map for comfort. Notice that you just’ll want the BD-1 Electro Dart capacity to open the door the place the chest is.
All Databanks Entries
There are two Databank Entries you may get within the first playthrough. The primary is the Gonk droid on the Skylane Regulation Station close to the place you struggle the Inquisitor. Begin on the Meditation Level there and go down the close by staircase into the corridor. The droid is there on the left.
The second Databank Entry is on the floating management station in the midst of the placement. Work together with the terminal to acquire the Databank Entry.
When you full the principle storyline, you possibly can return to Coruscant to pay attention to the final Databank Entry. It’s close to the Mantis touchdown pad, not removed from the Scavenger droid with the Priorite Shard.
All Priorite Shards
It’s potential to get every Priorite Shard within the first playthrough and every is straightforward to amass. The primary Priorite Shard is on the Balcony while you cross over to the hanger part characterised by the pink hallways and Republic structure. Stroll to the nook of the balcony going through the remainder of the Hanger 2046-C and also you’ll discover the Priorite Shard there. Confer with the function picture of this information and the map for added context.
The final Priorite Shard is close to the touchdown pad for the Mantis. Proceed previous it and also you’ll spot a Scavenger droid holding it. Chase and destroy the droid to amass the Priorite Shard.
All chests
The chest is in reality a terminal on this case, which lets you hack the heavyweight DT Imperial Sentry Droids. The terminal location is in a aspect hallway via the pink hallways with Republic structure that interlink the touchdown pad to the ziplines throughout the Skylane house within the space. You’ll be aware the facility conduit above the door. Use BD-1’s Electro Dart to energy and unlock the door. Your subsequent process is then to destroy D-L1T, the “Legendary” Imperial Sentry Droid.
Now you already know the place to seek out all the Coruscant collectible places in Star Wars: Jedi Survivor in addition to learn how to get every thing. We even have guides on all Mountain Ascent collectibles places on Koboh, all Arid Flats collectibles places on Jedha, and all 18 Bounty Puck places to call a number of.
